Posts Tagged 'Italian'

Hot Italian Sausage In Tomato Sauce

Update: This recipe won a 1st place Blue Ribbon at the 2013 Arizona State Fair in the Canning Meat category.

Italian Sausage in Tomato Juice

20130716-184452.jpg

I’m trying to delve deeper in to the world of canning. To try more meats. And specifically, to can more things that are closer to ready to eat.

We were at the grocery store looking for pork to smoke (a whole different post) when I saw packages of hot Italian sausages on clearance for half price. In the past I would have frozen them. But I figure, why not put em in a jar?

The National Center For Home Preservation says to brown sausage and then process it in water, stock or tomato juice. My thought process was this: water would be a waste. Why remove all that flavor into water that would likely be drained out anyway. Stock sounded ok. But all I had was previously home canned smoked chicken stock. And that didn’t sound that great. So that left me with tomato juice, which I didn’t have. But what I did have was previously home canned tomatoes.

I figure hot italian sausage is destined to be in pasta sauce at some point in the future. So why not process it in tomatoes now? I grabbed a wide mouth quart of canned tomatoes off the shelf. The immersion blender fits right in the top, and in no time it was a quart of tomato puree. I put that in a pot with a pint of water to make my tomato juice.

I placed the sausages in a pan and browned them on both sides.
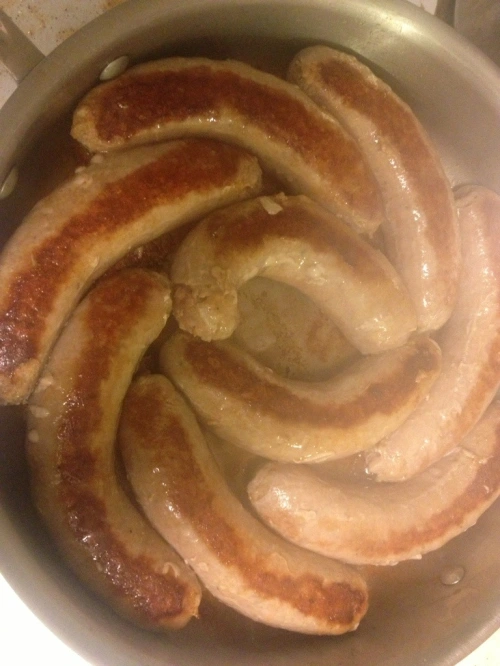
20130716-174651.jpg
Once they were brown I cut each sausage in to 5 pieces.
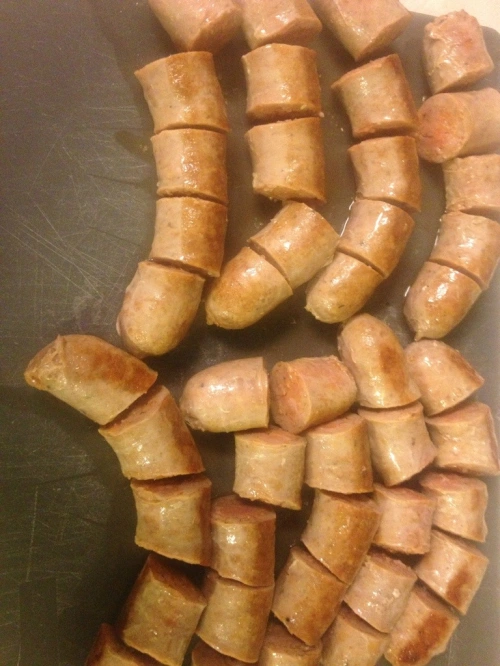
20130716-174805.jpg
Place the pieces in a quart jar. This took a little bit if engineering. But luckily years of playing Tetris paid off. Just make sure you’re filling voids in the jars where you see them. In total I cooked 6 pounds of sausages that ended up filling 4 quarts.

Heat the tomato juice to a boil and cover the sausage pieces with the juice. Leave a 1″ headspace.
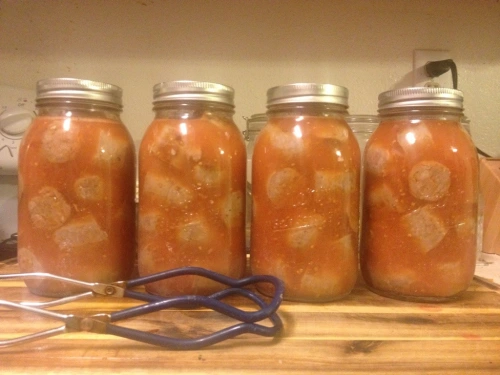
20130716-175403.jpg
Use a plastic utensil to remove any air pockets or bubbles. Why plastic, you ask? Because metal can cause micro scratches and fissures in the glass. This can be the catalyst for thermal fractures in the future.

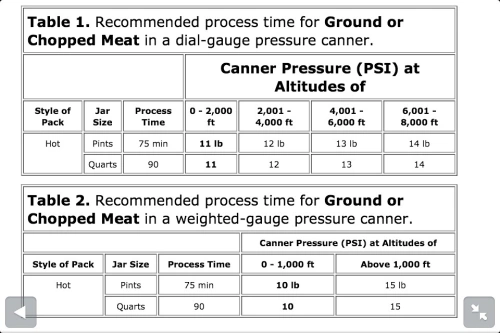
Top with lids and bands and place in a pressure canner at 11lbs for 75 min for pints or 90 min for quarts.
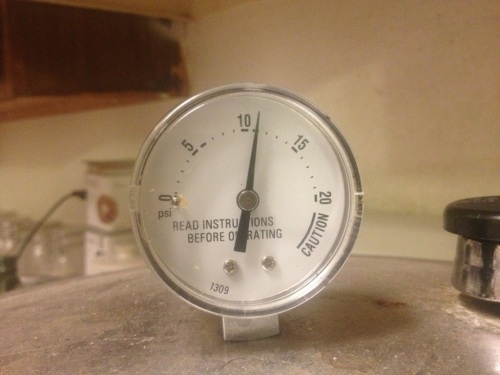
20130716-183309.jpg
Use this chart to adjust for altitude.
20130716-184022.jpg
Always turn off the heat and allow the pressure canner to cool by itself when the time is up.

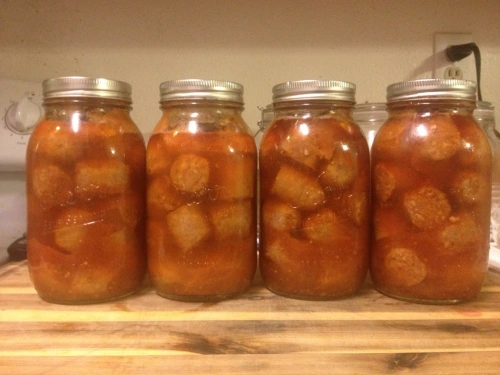
The finished product looks like this. Not too bad. Sometimes canned meat looks like a lab specimen. This looks more like Spaghettios.
20130716-184327.jpg
I’m huge on making my own pasta sauce right now. Generally it’s 2 quarts of tomatoes, onion, garlic, carrots, zucchini, squash, peppers, wine, balsamic, and spices. In theory a jar of sausages can be added, without taking the time to defrost and brown the sausages, cook them through, and letting them simmer in the sauce. The flavor’s already in there.

Happy canning.
Italian Green Beans

I love canned green beans. I’ve always loved them. Even the store bought ones. The first time I made my own my mind was blown. They taste exactly like store bought green beans, but with only 3 ingredients, and no chemicals.

Home canning green beans is more labor intensive than other canning endeavors, but is one of the simplest recipes ever. As with all low acid foods, you need a pressure canner to safely process the green beans for preservation.
Superstition Ranch Market had fresh green beans on sale for $0.69 a pound so I grabbed 5 pounds while we were out today. I brought them home, rinsed them off and started preparing them. I grab a small handful at a time, lay them on the cutting board, and cut a 1/8 of an inch of each end. You only need to cut the stem end, but I slice off both ends because I can clean them quicker by avoiding aligning all the beans the same direction. The I cut the beans in to 1-2″ segments.

Clean, sterilized and prepare you jars. I use the pint sized, and prefer wide mouth for green beans. Fill each jar with green beans. Now you have options. You can go with just water if you need a low sodium diet. You can add a pinch of salt to the beans for a little flavor. Or, my favorite is a pinch of salt, and half a pinch of Thyme and Oregano in each jar. The dried herbs add just a hint of flavor to the beans.

Green beans, salt, thyme, oregano.

Then you simply use your canning funnel to add boiling water to each jar. Remember to leave your head space. Hand tighten the bands over the lids and process in a pressure canner at 10 lbs for 25 minutes. It’s fine to double stack in a pressure canner. But either offset the cans so they aren’t directly on each other, or use a piece of sheet metal with holes in it to create a 2nd layer.

Let the canner cool, and presto, 10 pints of green beans.

My favorite part of canning is still knowing what’s going in to the jar, what’s not, and knowing what my kids are eating. And speaking of, green beans are the one vegetable my kids gobble up without question, every time.

Roasted Garlic

Here’s a super easy and delicious recipe for making roasted garlic.  Roasted Garlic is delicious in spaghetti sauce, salsa, whipped into butter, spread on toast points, or, if you’re like Dess, plain out of the wrapper.

Roasted Garlic:

  • Garlic
  • Olive Oil
  • Aluminum Foil

Set the oven to 400 degrees.

Take your garlic, and remove the out layers of skin.  Leave the cloves in tact, but remove the outer layers.  I just held the bulb in one palm, and twisted my other palm around it.

Cut the top off of the bulbs, making sure the top of every clove is exposed.

Repeat with every head of garlic.  The nice thing is, you can make as many or few as you like.  We got 12 heads of garlic in our produce basket from Bountiful Baskets a few weeks ago.  I roasted most of them tonight so they don’t go bad.

After the tops are cut off, drizzle olive oil over the cloves.

Wrap each bulb in aluminum foil as such:

The easiest way to do this is to place each wrapped head of garlic in a muffin tin.  I guess you could use a cookie sheet, but I think the muffin tin surrounds them with more heat.

Place the tin in the oven and roast for 30-35 minutes.  The garlic should be brown, but not burned.   Remove from the oven and allow to sit for 5 to ten minutes in the foil.  Then remove the foil.

The cloves come out easily.  You can slit the casing, pull them out with a fork, or just squeeze a little and they pop right out.

I threw my garlic in a mason jar, and put it in the fridge.

Now go make some pasta sauce (hopefully my next entry) with roasted garlic, and top some toasted baguette with butter and garlic.

If you plan to infuse oil, or to cover the garlic in oil, please be careful. Do not store garlic in oil at room temperature. Garlic-in-oil mixtures stored at room temperature provide perfect conditions for producing botulism toxin (low acidity, no free oxygen in the oil, and warm temperatures). The same hazard exists for roasted garlic stored in oil. At least three outbreaks of botulism associated with garlic-in-oil mixtures have been reported in North America.


Enter your email address to follow this blog and receive notifications of new posts by email.

Join 368 other subscribers